When you get a new TV, the default settings probably won’t be fully optimized out of the box. If you want to watch movies and TV shows the way the director intended, there are several settings that you might need to change. Here are the best picture settings for every major TV brand and how to change them yourself.
How Do You Calibrate a TV?
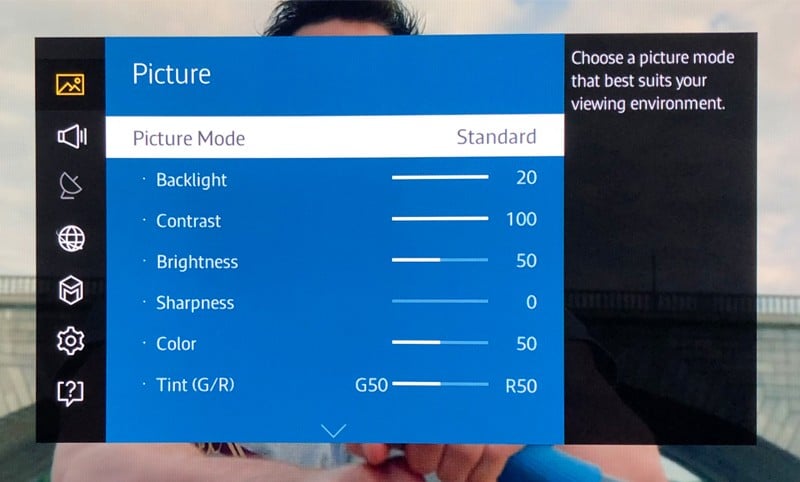
To calibrate your TV manually, press the “Menu,” “Settings,” or “Home” button on your remote control and then navigate to “picture settings” or something similar. From here, you will be able to change your picture mode, brightness, contrast, and more.

You can also use a calibration disc or have your TV calibrated by a professional. However, these options can be complicated and expensive. If you want to calibrate your TV on your own, here are the settings you should change.
Picture Mode: Use Movie/Cinema Mode
The first setting you should change on your TV is the “picture mode.” These days, TVs come with several picture modes, which can look drastically different from one another because they use different settings for backlight, sharpness, and more.
For the majority of TVs, the Movie or Cinema mode is generally the most accurate, which means the image will look closer to what the filmmaker or content creator intended. However, you might notice this setting makes the image darker and warmer.

While it is recommended that you switch to the Cinema or Movie mode, this might not be the best setting for you. If you watch TV in a room with a lot of light, you might want to consider using another picture mode instead.
Dynamic/Vivid Mode
You might want to use this setting if your TV is in a very bright room since it gives you the brightest output. However, the colors won’t be accurate, so you won’t experience movies the way the content creator intended.
Normal/Standard Mode
You might want to use this setting if you watch TV at all times of the day and night. It is a good balance between the Movie/Cinema mode and Vivid/Dynamic mode, and it can be suitable for several lighting conditions.
Brightness: Set at 50%
Setting your TV’s brightness level too high will make the black areas lighter, which can make the image look “washed out.” Setting your brightness level too low will make the image totally dark. So, the best option is to leave your TV’s brightness level at the default level or set it to around 50%.

As you can see in the picture above, setting your TV’s brightness level too high can even wash out the black bars above and below the image. If you want your TV to be brighter, you should increase the backlight instead.
Backlight: Lower Is Better
Changing the backlight actually changes how much light your LCD or LED TV screen produces. The higher you set your backlight, the brighter your screen will be, so you will be able to see more detail in the image. However, setting the backlight level too high can make the light parts of an image appear too bright.
OLED TVs won’t have a backlight setting. Instead, you can adjust your screen’s brightness with the “OLED light control” setting. However, if you set this too high, it will increase your screen’s image retention, which means parts of an image will temporarily “stick” on the screen after that image is gone.
You can change your TV’s backlight settings depending on how bright your room is. To prevent eye fatigue, you might want to turn this down in a dark room and turn it up in a well-lit room. However, setting your backlight lower is often more accurate.

If you want to change your TV’s backlight settings, pause a movie on a dark scene and turn the backlight to zero. Then slowly increase the backlight level until you see enough detail in the dark areas, but make sure the light areas are not too bright.
Contrast: Set at 100%
Adjusting contrast settings changes the “white level” or how bright the whitest parts of your images are. Set the contrast too high, and you’ll lose details in bright scenes. Set it too low, and the picture quality will appear drained or flat. In most cases, you want to set the contrast as high as possible.

To find the right contrast setting, pause a movie on a scene with very bright areas and lots of details, like clouds, a wedding dress, snow, or fur. Then turn the contrast to 100% and decrease it until you start to see details in the brightest areas. But don’t set it too low, or the bright parts of the image won’t be bright enough.
Sharpness: Set at 0%
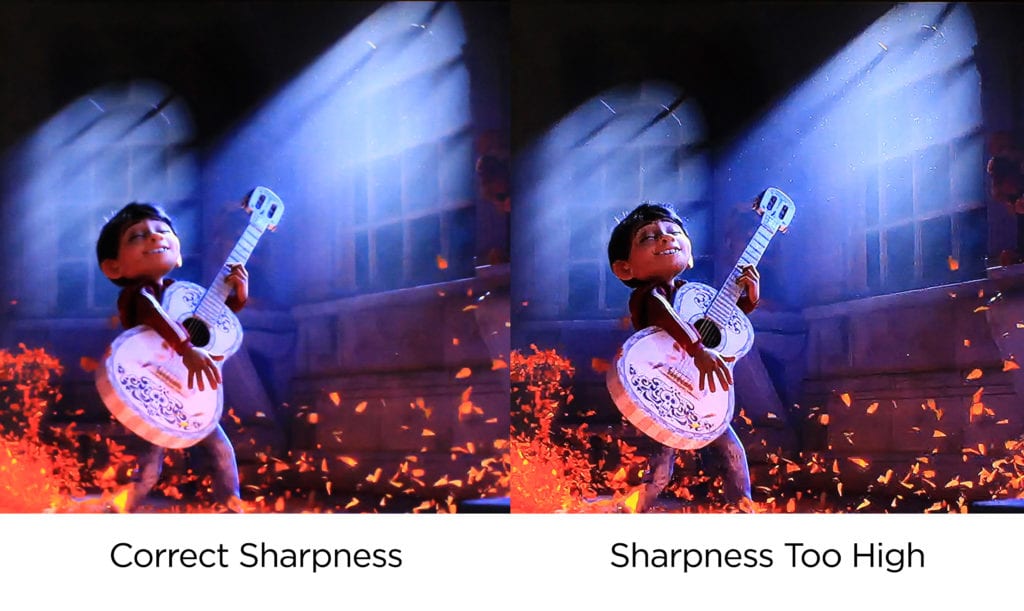
The sharpness setting on your TV changes how defined edges will appear on your screen. If you set your sharpness too high, it won’t necessarily improve your TV’s image resolution or overall clarity. Instead, it can make outlines overly distinct, resulting in “muddy” picture quality.
Of course, you want the images on your TV to be sharp, but most movies and TV shows are already sharp enough. So, you want to set the sharpness value to be fairly low. Depending on what TV you have, you should set your sharpness to 0% or anything under 50%.

If you notice a halo appearing around objects or if the image is too grainy, your sharpness setting might be too high. You will also notice that motion looks more natural when your sharpness settings are correct.
Color: Set at 50%
Color settings allow you to change the level of color saturation on your TV screen. Setting this too high will make colors appear unreal, while setting it too low can make the images on your TV black and white.

Hue/Tint: Set at 0%
Hue or Tint settings change how red and green images look on your TV screen. This setting is most usually at the correct level by default. Unless your TV appears to have a green or red tint already, keep this setting at the default 0%.

Color Temperature/Tone: Set to Warm
Color Temperature or tone settings let you change the hue of your TV between Warm (red) and Cool (blue). The Warm tone is more accurate, and it will make skin tones appear more natural. If it’s too red for you, try the Medium or Normal tone instead.

Most TVs will automatically change the color temperature (or color tone) when you choose a picture mode. So, you might not have to manually change this setting if you already set the picture mode on your TV to Movie/Cinema.
Motion Smoothing/Interpolation: Turn Off
Motion Smoothing was created to decrease motion blur by “guessing” what is between two frames and inserting a hybrid image. While it might be a good idea to turn on this setting when watching sports or reality shows, it can create overly-smooth motion on most movies and TV shows.
Most TVs have Motion Smoothing enabled by default, but Tom Cruise feels so strongly about this feature that he recently shot a PSA urging fans to turn the setting off in order to enjoy movies “exactly as the filmmakers intended.”

You should also turn off Motion Smoothing if you are playing a game, as it can lead to noticeable delays or lagging.
Local Dimming/Contrast: High
Local Dimming divides your TV screen into different “zones” so it can dim the dark parts of the screen without affecting the bright areas. This makes the contrast look great for watching movies, especially in the dark. So, if your TV has this setting, it is recommended that you turn it on high.
Read More: What is local dimming?

However, not all TVs have this setting, and only a few do it well. In order to find the best setting, pause a movie on a scene that has bright areas next to dark areas, like a space scene or a black and white movie. Then turn Local Dimming on and off to see which one has the best picture quality.
HelloTech editors choose the products and services we write about. When you buy through our links, we may earn a commission.


