These days, it’s hard to protect your kids from seeing inappropriate things online. That’s why it’s so important to know how to set up parental controls on their computer. This allows you to block them from seeing adult content, and it also lets you set up time limits on their computer or Xbox. You can also choose to monitor their online activity to see which sites they are visiting or trying to visit.
In order to set up parental controls for your child, you first have to create a Microsoft account for them. If your child already has a Microsoft account, you can skip the first section, and scroll down to the section on how to set up parental control in Windows 10.
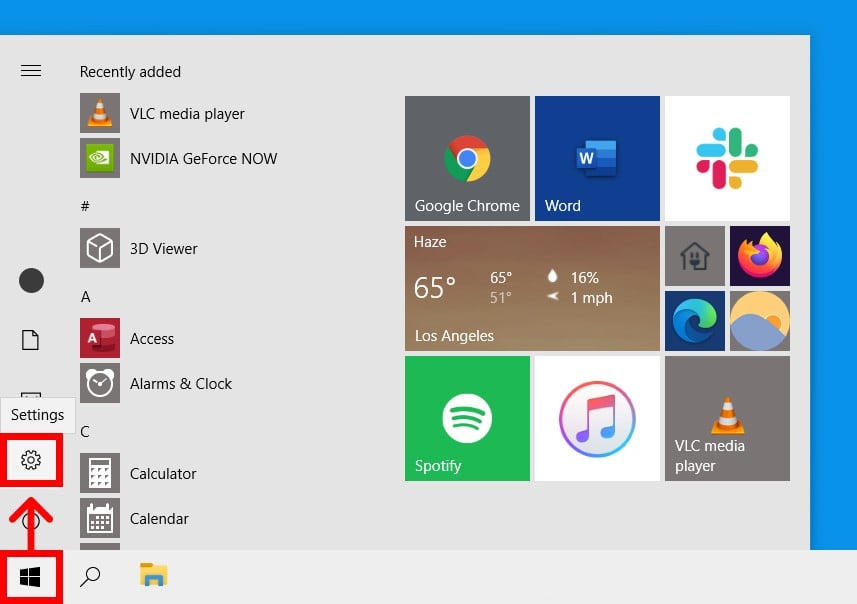
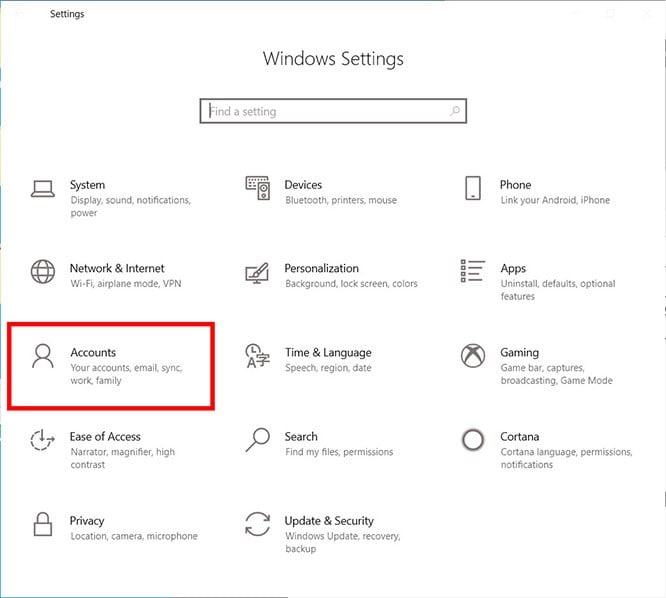
To set up a Microsoft account for your child, go to Start > Settings > Accounts > Family & other users > Add a family member. Then click Add a member and follow the on-screen instructions.
Note: You will have to be signed in to your Microsoft account before you can create one for your child. You can do this by going to the Microsoft account page and clicking Sign in. Then follow the on-screen instructions or click Create one.


If your child has an existing email address and they are old enough, they will receive an email asking them to accept your invitation. They will then be required to sign in with their Microsoft account password.
If you are creating a new email address, you can only choose an Outlook or a Hotmail email address. Then create a password for your child’s email account. Next, enter your child’s name, country, and date of birth. Next, sign in to your child’s new account with the email address and password that you just created.
Depending on the age of your child, you might have to click on your account or enter your email address in order to confirm their account. You will then receive an email asking you to sign in to your account to give your child permission.
Follow the on-screen instructions and decide whether you want to allow your child to access third-party apps. Finally, click Manage settings to set up parental controls.
To set up parental controls on a Windows 10 computer, go to family.microsoft.com and sign in. Then find your child’s account and click More options > Content restrictions. Then turn Block inappropriate websites on.
This will block your child from seeing any explicit content online, on any apps, games, and other media. You can also choose to restrict the amount of time they can spend on their computer or Xbox, monitor their online activity, require them to get permission before buying anything online, and see their location on a map.
Once you set up content restrictions, your child will not be able to access Google Chrome, Firefox, or any browsers other than Microsoft Edge and Internet Explorer. If they try to open another browser, they will get a message telling them to ask an adult in their family for permission.
And, if a child tries to enter a URL for a site that you entered in the Always blocked list, they will get a message telling that that they need to ask an adult in their family to use that site.
Finally, if your child tries to search for inappropriate content on Edge, they will see a message that says that they have to change their settings.
However, they will not be given the option to change their settings.
If you want to allow your kids to use Chrome, check out our step-by-step guide on how to block websites on Chrome.
Once you set up your restrictions, you can then choose to be able to monitor your child’s account.
You can also click Spending in the menu above to allow your child to buy things without your permission. This is set to require your permission by default. Then you can add money to your child’s account and allow them to shop for apps and more online.
You can also click Find your Child and then turn on the feature to see where your child is. However, your child will need to have a Windows 10 phone or an Android device with the Microsoft Launcher app running.
Learn how to take a screenshot on an iPhone X, and any other model of… Read More
Learn how to forget a WiFi network on your Mac, so your computer won’t automatically… Read More
Learn how to set up a guest WiFi network for the next time you have… Read More
Whether you want to record a video you found online or you need to show… Read More
With a Windows 10 PC, you can easily fill your entire screen with two different… Read More
Learn how to connect your smart plug to Alexa. Also, what a smart plug is… Read More
This website uses cookies.